Creative Coding with Bitsy
Introduction to Digital Humanities
Alice McGrath
2025-04-22
Outline
- What is creative coding?
- Introduction to Bitsy
- The Bitsy Editor
- Planning and developing your game
- Saving and publishing your game
Creative Coding
Using code to explore and play: games, artwork, storytelling, experiments.
- Listen: Mark Sample, “Dream Lab Podcast: Creative Coding”
Examples
- Twitter Bots, e.g. @Pentametron
- The infinite catalog of crushed dreams, Mark Sample (2020)
- One Hundred Thousand Billion Bryn Mawrs (2025). Inspired by Raymond Queneau’s One Hundred Thousand Billion Poems (1962)
- “The Wilderness Downtown”, Chris Milk (2010)
Tools
- Twine - interactive text-based storytelling tool
- Unity - 3D game engine
- Processing - software language for visual design
- Bitsy - 8-bit game engine
- A much longer curated list
Bitsy
- A tool for building 8-bit video games
- Open-source, browser-based, and easy-to-learn
Bitsy examples
- Chop Suey by Shiamin Kwa
- Under a star called sun by Cecile Richard
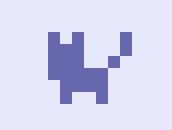
- Kitten-wrangler by Alice McGrath
CHOPSUEY a Bitsy game by Shiamin Kwa
Kitten-wrangler by Alice McGrath. On GitHub: atmcgrath/kitten-game
Features of a Bitsy game
- Multiple rooms or spaces to move through
- Simple UI text
- Non-player characters to interact with
- Objects to pick up (can be counted)
- Exits and entrances (can have conditions/require keys)
- Music, sound effects, and simple animation options
The Bitsy Editor
A tour of the Bitsy editor interface: make.bitsy.org/
Editor windows
- tools: show the menu of tool windows, select which ones to toggle on
- play: test out your game
- about: instructions and documentation
- game: load or save your game
- room: the main editor for the space of your game
- paint: design and add your characters and objects
- avatar: your player
- tile: an obstacle square
- sprite: NPC who can deliver information
- item: objects you collect
- exits & endings: what happens when you finish a room
- colors: customize colors
- dialog: UI text and narrative elements (interaction conditions)
- tune and blip: music and sound effects
- find: search among your game resources
- inventory: keep track of items and variables
Your turn!
- Give your game a title
- Customize your colors
- Create two rooms and customize them with tiles
- Create an exit to link the two rooms
- Place a sprite and some items (use ‘paint’)
- Edit and add dialogs
- Play your game to test it out!
Challenges
- Customize your avatar, sprites, tiles, and items
- Create a locked exit dialog to impose conditions
- Create simple animations
- Customize music and blips
- Look at your game ‘data’ (under ‘game’ window): what do you see?
Planning your game
Storyboarding
- Who is your avatar character?
- Where are they?
- What is their mission?
- Who and what will they interact with?
UX design
- How will your player know what to do?
- Dialogs and Sprite interactions
- What are the spaces/levels/narrative beats?
- Rooms, dialogs
- Set up challenges and conditions
- Locked exits, dialogs, variables
End-game
Saving and loading your game
- Select ‘game’ to open the export-import menu
- Select ‘save game’ to download your game as
.html - When you want to work on it again, it may have been saved in your browser session. Otherwise, you can select ‘load game’ and upload the same html file
Publishing your game
You have two options for publishing your game on the web:
- GitHub offers free webhosting through GitHub Pages
- BiCo folks can get a webhosting account through Domain of One’s Own (BMC) or Haverford Sites (HC)
GitHub instructions
1. Create a new repository
- Log in to GitHub.com and create a new repository called “bitsy-game”
- Upload the html file for your game to the repository
- Rename the html file
index.html
2. Publish your repository
- From your repository, go to the ‘settings’ tab and scroll down to pages
- Under ‘Source’ select ‘deploy from a branch’ and select “main” branch, then “save”
- Wait for a few minutes for the deployment to finish
- Your site’s url:
username.github.io/bitsy-game
NB: this GitHub deployment guide has step-by-step instructions and screenshots
Domain of One’s Own
- Navigate to digital.brynmawr.edu or sites.haverford.edu
- Click ‘Get Started’ and sign in with your username
- Select a personal subdomain name (this will be part of your URL)
- Locate the “File Manager” (in the “Files” section) on the list of tools
- Navigate to the “public_html” folder
- Create a subfolder called “game”
- Renaim your game file
index.html - Upload it to the “game” folder
- Your site’s url:
yourdomain.digital.brynmawr.edu/game
Making changes
- Load your Bitsy game file back into the editor
- When you are done, export the html file and replace the old one on GitHub or DoOO
- Don’t forget to change the filename to ‘index.html’
Resources
- This Bitsy Handout has lots of tutorials and resources
- Read the Bitsy documentation
- Check out other Bitsy games